


0
Install TWRP and Root Samsung Galaxy S10/S10+/S10e using Magisk
TWRP for Galaxy S10 devices is now available. In this guide, we will show you how to install TWRP recovery and Root Samsung Galaxy S10, Galaxy S10+, and Galaxy S10e using Magisk.
A week ago, we published a tutorial on how to root Samsung Galaxy S10 devices without TWRP. Not so long after that, TWRP 3.3.0-0 was releasedand official support was added for the Exynos Galaxy S10 and Galaxy S10+. So, if you wish to install TWRP, you can do so now and also root your Galaxy S10 device simultaneously using Magisk.
Before you head to the instructions below to install TWRP and root Samsung Galaxy S10/S10+/S10e with Magisk, let us take some time to understand why rooting your Galaxy S10 series is tricker and different than the traditional method that we have been using so far.
Rooting Samsung Galaxy S10 Series – Explained by topjohnwu
According to Magisk developer topjohnwu (John Wu), the newer Samsung devices like the Galaxy S10 series use the /system partition as root, instead of the /boot partition. Well, it’s a requirement for every device to be launched with Android 9 to use system-as-root. However, Samsung further implemented more changes in the bootloader, which doesn’t allow the boot.img to load anything other than the kernel binary.
To deal with this, Magisk should now be installed to the /recovery partition. The developer implemented a solution that will detect the button presses/combination to decide in which mode the device should boot into (Unrooted stock OS, Recovery, or rooted OS with Magisk).
Further complications were added with “VaultKeeper”, which is a new bootloader feature implemented by Samsung. It basically is another lock over the OEM lock and re-locks the bootloader after a data wipe. It is only after the first boot after data wipe, that VaultKeeper verifies the OEM Unlockand changes the bootloader state accordingly.
All this has caused a lot of problems when it comes to the development scene and things like TWRP and Magisk Root. However, thanks to topjohnwuand developers like ianmacd, it is now possible to install TWRP and root Samsung Galaxy S10/S10+/S10e with Magisk following a specific set of instructions, as laid below.
Prerequisites
Before you begin with the instructions to install TWRP and Root Samsung Galaxy S10/S10+/S10e, make sure that you fulfill all the requirements stated below.
- This procedure will wipe your device completely, including the internal storage, maybe even multiple times. Until you have finished the procedure successfully and booted your phone, do not restore any data. So, make sure that you take a complete backup of all your data stored on the device.
- A MicroSD card of your choice and a Windows PC.
- Charge your Galaxy S10 device to a sufficient battery level (above 40% at least). This shall help avoid any sudden shutdowns during the rooting process.
- Download and install the latest Samsung USB drivers on the PC.
- Also, download Odin v1.13.1 and extract the package to an easily accessible location on the PC.
- Important: In order to install TWRP and root, you must first unlock the bootloader. Please visit this guide and follow the bootloader unlocking instructions, then come back here to further install TWRP on Samsung Galaxy S10/S10+/S10e and root it using Magisk.
- Download the Multi-Disabler zip and transfer it to the MicroSD card before you commence with the procedure.
How to Install TWRP and Root Samsung Galaxy S10/S10+/S10e using Magisk
For your convenience and easy understanding, we have split the instructions into different steps. Make sure that you follow each and every step, and in the given order.
Step 1: Download the Required Files
You must first download all the required files like AP firmware file, TWRP image, and multi-disabler zip.
- Download the stock firmware for your Galaxy S10 device using the SamFirm Tool or through firmware database like SamMobile, SamFrew, etc. Make sure that you download the same firmware as installed on your device. Once the stock firmware package is downloaded, extract it to get the AP firmware file.
- TWRP Image for Samsung Galaxy S10, Galaxy S10+, and Galaxy S10e:
- SM-G973F (S10): twrp-beyond1lte-3.3.0-1_ianmacd.img (Unofficial) | twrp-3.3.0-0-beyond1lte.img (Official)
- SM-G975F (S10+): twrp-beyond2lte-3.3.0-1_ianmacd.img (Unofficial) | twrp-3.3.0-0-beyond2lte.img (Official)
- SM-G970F (S10e): twrp-beyond0lte-3.3.0-1_ianmacd.img (Unofficial)
- Multi-Disabler zip: multidisabler-g97x-1.1.zip
- Disables File-Based Encryption (FBE), VaultKeeper, Process Authentication, and prevent stock recovery restoration.
Step 2: Patch the AP Firmware File and TWRP Image using Magisk Manager
Now, you must patch the extracted AP firmware and TWRP image files using the Magisk Manager on your Galaxy S10 device.
- Download the AP firmware and TWRP image files, and transfer them to the device’s storage
- Download Magisk Manager v7.1.2 APK and install it on your Galaxy S10 device
- Once installed, open the app drawer on the device and launch ‘Magisk Manager’
- Tap on the ‘Install’ button
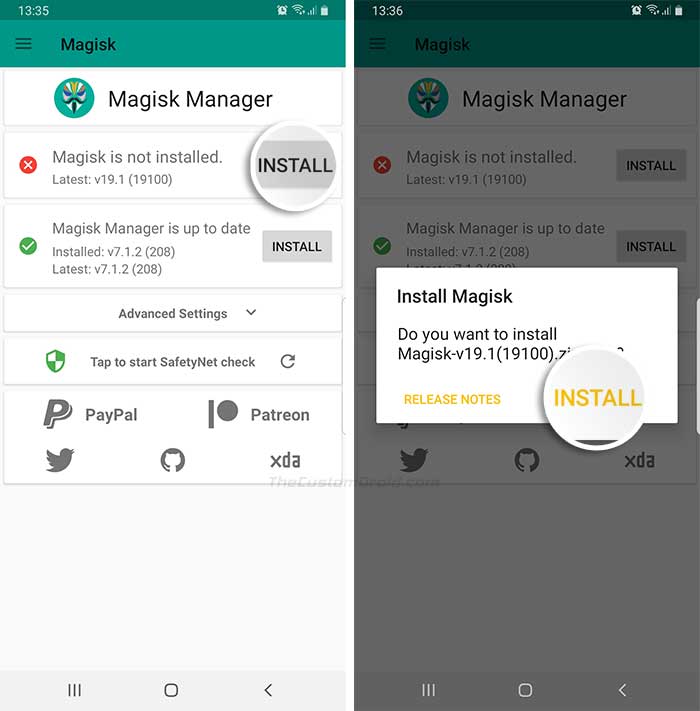
- Next, tap on ‘Install’ and select ‘Select and Patch a File’ option
- Navigate to the device’s storage and select the AP firmware file first
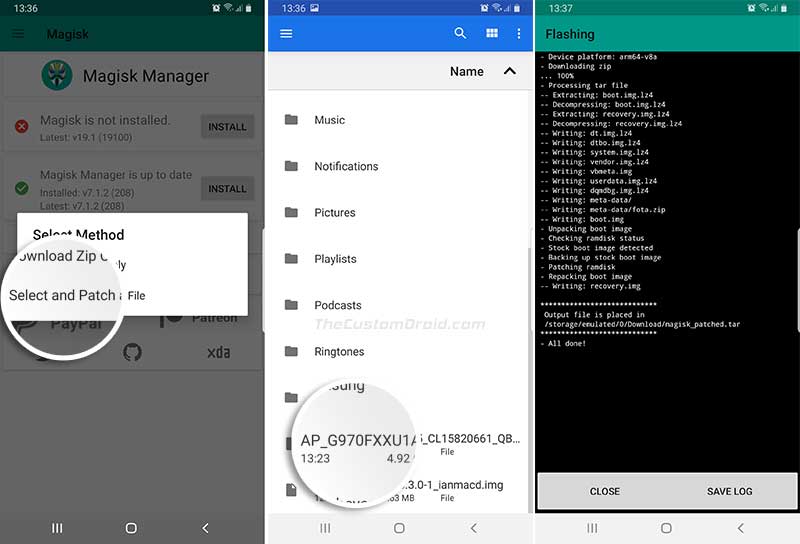
- Magisk will patch the AP firmware file automatically
- Repeat step 4 to step 6 again and patch the TWRP image file now
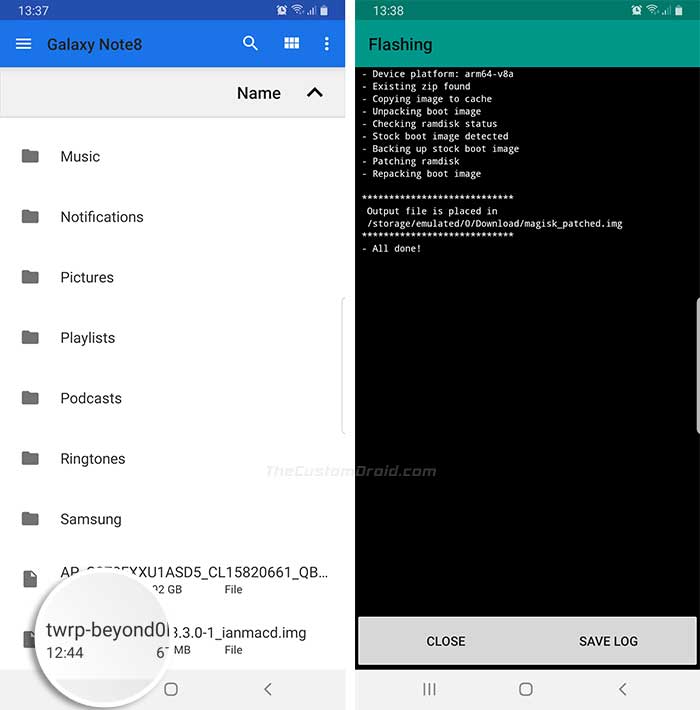
- Once done, the magisk_patched.tar (patched AP firmware) and magisk_patched.img (patched TWRP image) files will be available in [internal storage]/Download/
- Connect your phone to the PC and transfer both the files to an easily accessible location.
Step 3: Replace Stock Recovery Image in Patched AP Firmware File with Patched TWRP Image
At this point, the patched AP firmware file contains the stock recovery. So, we will need to replace it with the patched TWRP image. To do so, follow the instructions below:
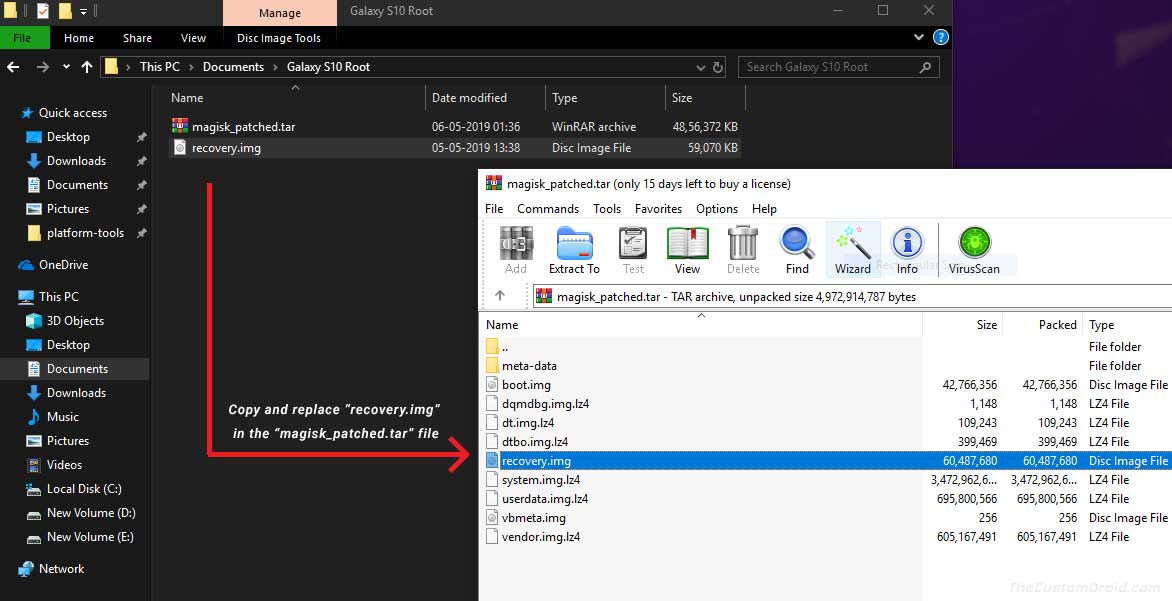
- First, rename the “magisk_patched.img” file to “recovery.img”
- Now, open the “magisk_patched.tar” (Patched AP firmware file) using an archive tool like 7zip or WinRAR
- Copy the “recovery.img” file to the Patched AP firmware file in order to replace the stock recovery image with the patched TWRP image
Step 4: Install TWRP and Root Samsung Galaxy S10 by Flashing the Patched AP Firmware File
Now, you need to flash the patched AP firmware file to install TWRP and simultaneously root Samsung Galaxy S10/S10+/S10e using Magisk.
- Boot your Galaxy S10 device into Download Mode. To do so:
- Power off the device completely. Then press the Volume Down + Bixby buttons together. While holding the buttons, connect your phone to the PC using the USB cable.

Image credits: NaldoTech
- Power off the device completely. Then press the Volume Down + Bixby buttons together. While holding the buttons, connect your phone to the PC using the USB cable.
- Go the folder on the PC where the Odin 3.13.1 tool was extracted
- Double-click on the ‘Odin3 3.13.1.exe’ executable file to launch the Odin tool
- Uncheck ‘Auto Reboot’ under the ‘Options’ tab in Odin
- Click on the ‘AP’ button and select the ‘magisk_patched.tar’ file

- Finally, click on the ‘Start’ button to install TWRP and root your Samsung Galaxy S10/S10+/S10e using Magisk
- DO NOT REBOOT YOUR PHONE YET!
Step 5: Boot into TWRP, Flash Multi-Disabler zip, and Format the Data
It is extremely important that your boot your Samsung Galaxy S10 device into TWRP recovery mode to flash the Multi-Disabler zip and format the data (factory reset).
- Press Power + Volume Down buttons together to exit Download Mode
- As soon as the screen turns off, press and hold the Power + Volume Up + Bixby buttons until the Bootloader Warning screen appears
- Once the Bootloader Warning screen appears, release the Bixby and Power buttons, and keep holding the Volume Up button until the TWRP mode appears
- In TWRP, tap on the ‘Install’ button
- Navigate to the MicroSD card and select the ‘multidisabler-g97x-1.1.zip’ file
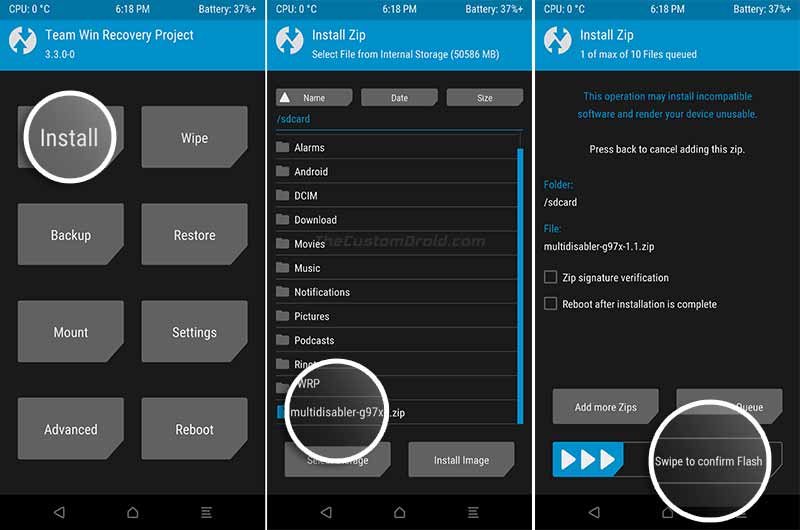
- Swipe the button on the screen to flash the Multi-Disabler zip file on your Galaxy S10
- Once the file has been flashed successfully, go to ‘Wipe’ > ‘Format Data’.
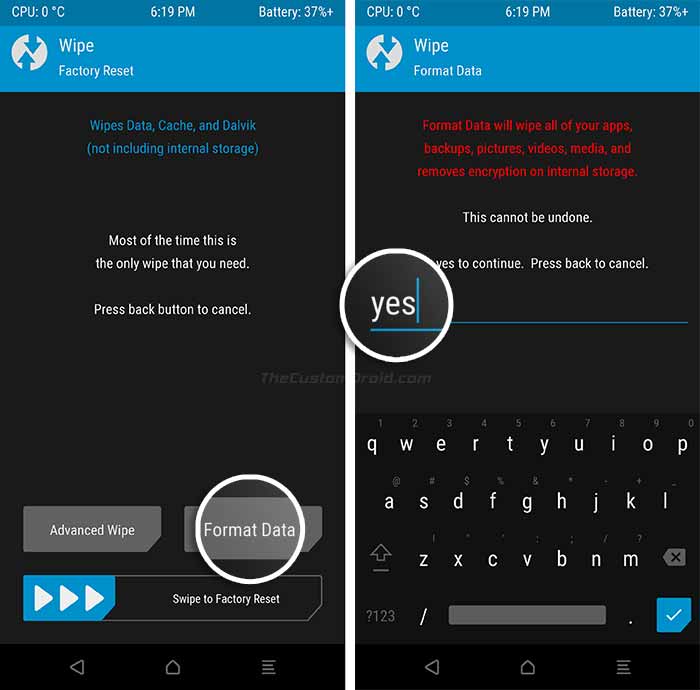
- Enter ‘Yes’ in the field to format the data partition/factory reset the device
- Finally, go to the ‘Reboot’ menu in TWRP and select ‘Recovery’ to boot your Samsung Galaxy S10 device into rooted OS with Magisk
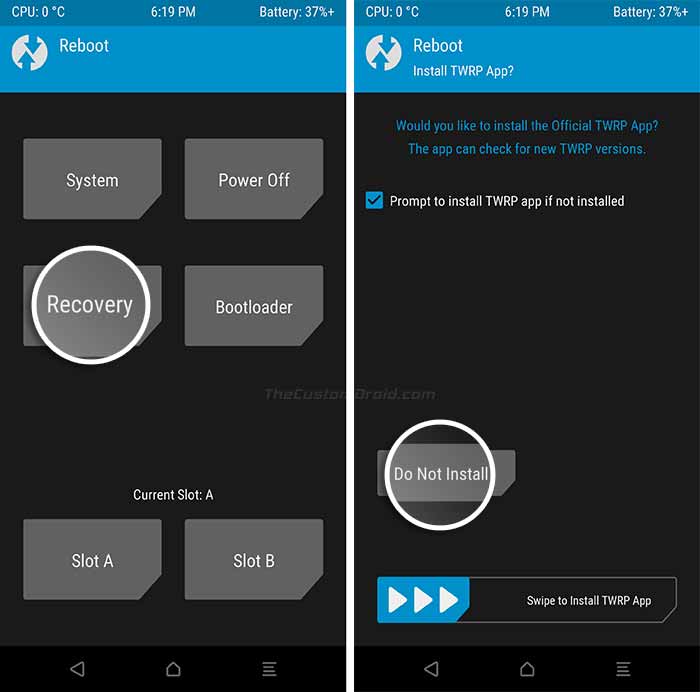
- If you’re prompted with the ‘Install TWRP App’ screen, tap on ‘Do Not Install’
- When your device boots into the OS, complete the initial setup and connect it to the internet via mobile data or WiFi
- Open the app drawer and launch ‘Magisk Manager’. In case the app doesn’t appear in the app drawer, download the Magisk Manager APK and install it
- Magisk Manager will now do the additional setup and the device will reboot upon completion.
That’s it! You have just succeeded to install TWRP and Root Samsung Galaxy S10, Galaxy S10+, and Galaxy S10e using Magisk.
How to Boot Samsung Galaxy S10 into TWRP Recovery or Rooted OS
Since Magisk now resides in the /recovery partition along with TWRP, it is important that you perform different buttons combination to boot your Galaxy S10 into TWRP recovery or rooted OS. So, to boot your phone into:
- Unrooted System: Press the Power button to power up normally will boot your Galaxy S10 into the Unrooted System.
- Rooted OS with Magisk: Hold the Power, Bixby, and Volume Up buttons together. Release all the buttons once the Bootloader Warning screen appears to boot your Galaxy S10 into Rooted System with Magisk.
- TWRP Recovery: Hold the Power, Bixby, and Volume Up buttons together. Release the Power and Bixby buttons and keep holding the Volume Up button when the Bootloader Warning screen appears, to boot your Galaxy S10 into TWRP recovery.
F.A.Q.
- A new update for Magisk has arrived, how can I update?
- It’s easy. Open Magisk Manager and tap on the ‘Update’ button and let it do the rest for you. According to the developer, you can only upgrade Magisk from within the Magisk Manager app, for now.
- After performing this procedure and rooting my Galaxy S10, I am not able to use apps like Samsung Pay, Secure Folder, etc. What should I do?
- You were already warned about this in this tutorial. Rooting/flashing any custom binaries trips the KNOX counter, which means you cannot use any apps that rely on its integrity. And no, restoring the stock firmware will not restore KNOX back to stock.
- A new software update has arrived for my device, can I restore the stock AP tar file or upgrade by simply flashing the full firmware via Odin?
- Restoring the stock AP file will ultimately lead to soft brick. In which case, you will first need to do a full restore via Odin and then factory reset (wipe) the device. When an update arrives, simply download the updated stock firmware from SamMobile, SamFrew, or using the SamFirm tool. Once done, grab the new AP firmware file and also the TWRP image. Then follow step 3, 4, and 5 again to install TWRP and re-root your device
We’d like to thank topjohnwu for developing a proper root solution for Galaxy S10 devices, ianmacd for TWRP recovery, and XDA senior member PiCkLeSfor providing these simple instructions.
So now, you have just been able to install TWRP on Samsung Galaxy S10/S10+/S10e and root it using Magisk. Go ahead and install some root-enabled apps on the device, or use Magisk Hide to cloak root from apps like Pokemon Go, etc.


0Awesome Comments!