1
Published on
mayo 15, 2019
Category:
root
How to Root Samsung Galaxy S10/S10+/S10e without TWRP
In this tutorial, we will show you how to unlock the bootloader and root Samsung Galaxy S10, Galaxy S10+, and Galaxy S10e using Magisk. Rooting the Galaxy S10 devices could be done without TWRP recovery by following a specific set of instructions as listed in this guide.
Samsung has surely improved their game when it comes to the software, be it their new One UI skin or delivering regular updates to their smartphones. But it is also well-known for screwing things up when it comes to the development front like rooting or flashing custom binaries. During the past few years, they have implemented some new security features to the software that have hindered the development process such as the Prenormal RMM State, DEFEX, etc.
With their latest flagship lineup – Galaxy S10, Samsung has introduced even more complexities that prevent users from rooting the phone(s) or installing custom binaries like TWRP, by following the old instructions. So before you learn how to unlock the bootloader properly and root Samsung Galaxy S10, S10+, and S10e, take some time to read more about the technical details below.
Rooting Samsung Galaxy S10 Devices: Explanation by Magisk Developer ‘topjohnwu’
According to topjohnwu’s post explanation on XDA, Samsung now uses the A-only system-as-root setup. This means that the bootloader does not load anything but the kernel string, which ensures that it uses the system as the root directory. To deal with it, the developer decided to install Magisk directly to the recovery partition, but that had some complications of its own.
To finally fix this, he introduced a solution that detects the button key presses when the phone boots up. So now since Magisk and recovery co-exist in the same partition, you have the option to boot in either one of them using specific button combinations.
Rejoice, S10 users! (and EMUI 9 users) Successfully made recovery and Magisk dual exist on the same partition! You will be able to switch between Magisk and recovery with volume key combos
32 people are talking about this
As per the developer “To make matters even worse“, Samsung added a new ‘VaultKeeper’ service which adds another lock on top of the ‘OEM Lock’ on the bootloader. The new security feature will relock the bootloader once the OEM Lock is enabled and data is wiped. The bootloader state is then verified after the initial device setup.
Quoting topjohnwu “If you are running custom firmware with stock system, DO NOT try to wipe data or else you might end up bricking your device due to vaultkeeper locking your bootloader up, which will eventually lead to bootloader refusing to boot because unofficial partitions are detected.”
So overall, the development for fool-proof root solution for Galaxy S10 devices took a lot of effort and time. And finally, with the specific instructions provided by topjohnwu, you can now root Samsung Galaxy S10/S10+/S10e using Magisk. It’d be generous of users to support the developer in any way possible. If you’d like to make any donations, then please visit this thread and follow up with the provided links.
Comprehensive Guide to Root Samsung Galaxy S10/S10+/S10e without TWRP
IN BRIEF: The process of rooting the Galaxy S10/S10+/S10e involves unlocking the bootloader first. Once unlocked, you will need to retrieve the ‘AP’ file from the stock Samsung firmware, then patch it using Magisk Manager, and finally, flash the patched AP file to the device using Odin. Furthermore, you will need to format the device completely and follow some additional steps before you can boot your phone into the rooted system (OS).
Warning and Disclaimer
Rooting your phone will wipe the data completely and trip the KNOX counter. This means your phone’s warranty will be void (destroyed) and you will not be able to use apps like Samsung Pay, Secure Folder, etc.
Proceed at your own risk and understanding. We shall not be held liable for any damage caused to your device by following this procedure or after it. Also, make sure that you fully understand the procedure before you perform it.
1. Requirements
In order to root Galaxy S10/S10+/S10e without TWRP, you must first fulfill the list of requirements as stated below
- The rooting process will wipe the device completely, including internal storage. So, make sure that you take a complete backup of all the data before you proceed. We also have an extensive guide on how to backup Android phones completely.
- Charge your Galaxy S10 device to a sufficient battery level (above 40% at least). This shall help avoid any sudden shutdowns during the rooting process.
- Download the latest Samsung USB drivers for your PC and install them.
- Also, download Odin v1.13.1 and extract the package to an easily accessible location on the PC.
2. Unlock the Bootloader
In order to root Samsung Galaxy S10/S10+/S10e, you must first unlock the bootloader. Unlike for the previous devices, unlocking the bootloader on Galaxy S10 is requires you to do more than just turning ON the OEM Unlock toggle due to the newly implemented VaultKeeper service.
The process is still very easy, just make sure that you follow the instructions as they are listed below.
- Go to ‘Settings’ > ‘About phone’ > ‘Software information’ on your Galaxy S10

These screenshots are for reference only. The build number and other software information on your Galaxy S10 device may differ. - Continuously tap on the ‘Build number’ section to enable the ‘Developer options’

- You should see “Developer mode has been turned on” message on the screen
- Go back to the ‘Settings’, scroll down to the very bottom and tap on ‘Developer options’
- Tap on the ‘OEM Unlocking’ toggle and select ‘Turn on’

- Now, power off your device completely
- While pressing the Bixby and Volume Down buttons together, connect your device to the PC using the USB cable
- Long-press the Volume Up button to unlock the bootloader on Samsung Galaxy S10/S10+/S10e
- Your device will be wiped (erased) completely and will automatically reboot
- IMPORTANT: Skip through the initial setup and make sure to connect the device to a WiFi connection. Do not set up any accounts yet!
- Repeat steps 1-to-4 again to enable Developer options
- Go to ‘Settings’ > ‘Developer options’ and make sure that the OEM unlocking toggle is turned on and greyed out
This will ensure that the VaultKeeper service has figured out the correct bootloader state. You can now follow the instructions below to root your Galaxy S10 device.
3. Root Samsung Galaxy S10/S10+/S10e using Magisk
- Download stock firmware for your Samsung Galaxy S10 device:
- Extract the downloaded firmware on the PC

The filename will vary depending on your device and model. But it should always start with “AP”. - Copy the ‘AP’ file (.tar) to the device’s storage
- On your Galaxy S10 device, download the latest Magisk Manager APK from Canary Channel and install it
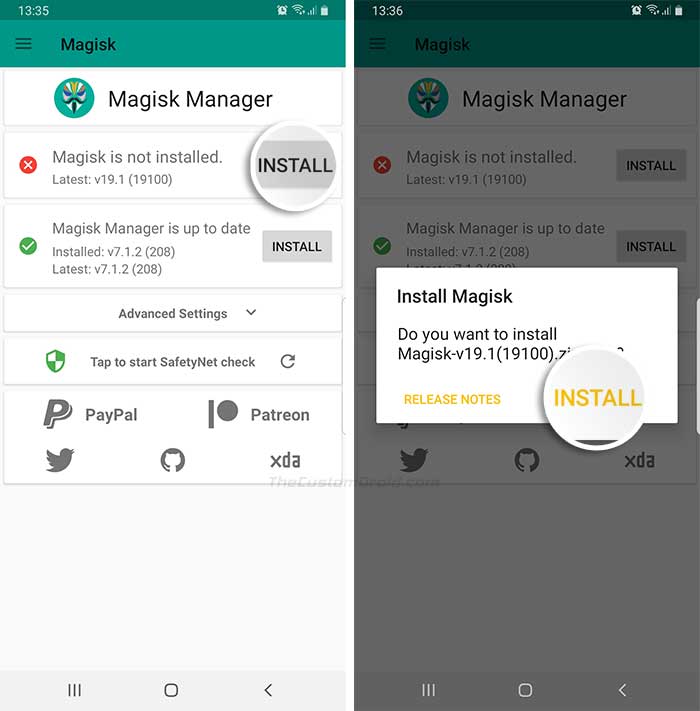
- Open Magisk Manager and tap on the ‘Install’ button

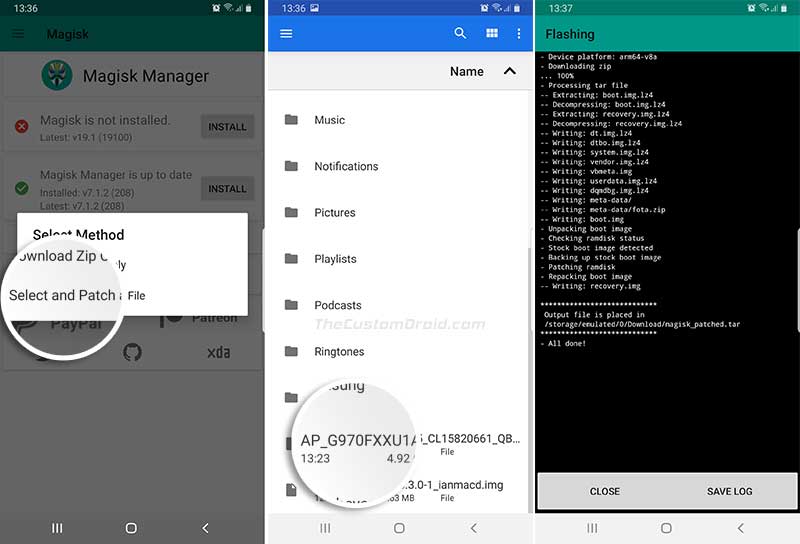
Go to ‘Install’ > ‘Install’ > ‘Select and Patch a File’ in Magisk Manager - Tap on ‘Install’ again and then on ‘Select and Patch a File’
- Navigate to the storage and select the AP tar file that was transferred earlier

- Magisk Manager will now patch the file and output the patched system firmware (AP) file to ‘[Internal Storage]/Download/’
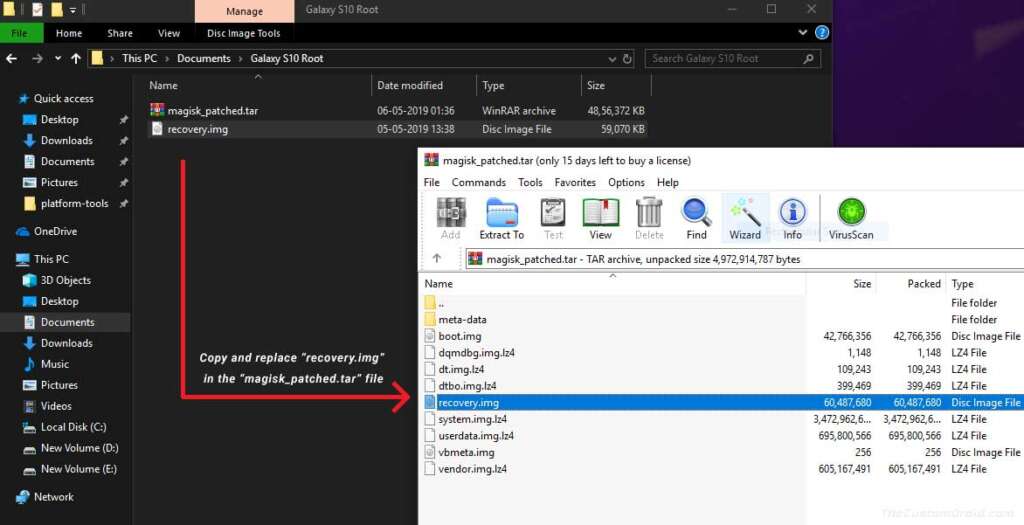
- Now transfer the ‘magisk_patched.tar’ file to the PC
- Run the Odin v1.13.1 tool on the PC
- Power off your Galaxy S10 device and boot it into Download Mode:
- Hold the Bixby and Volume Down buttons together and connect the phone to the PC using the USB cable
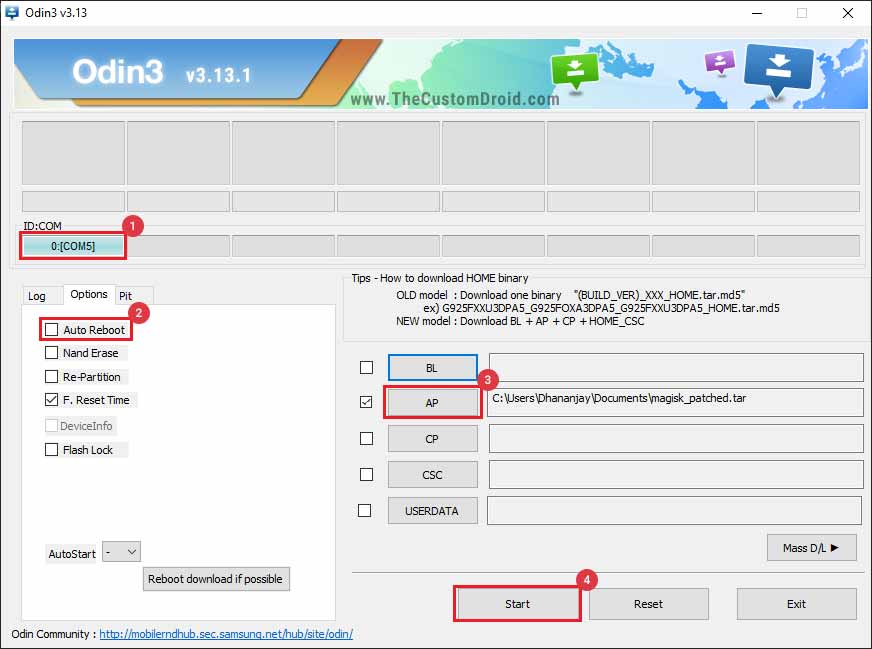
- The ‘ID:COM’ port in the Odin window should light up
- Important: Click on the ‘Options’ tab in Odin and uncheck ‘Auto-Reboot’
- Click on the ‘AP’ button and select the patched system firmware file (magisk_patched.tar) file

- Click on the ‘Start’ button to flash Magisk and root Samsung Galaxy S10/S10+/S10e
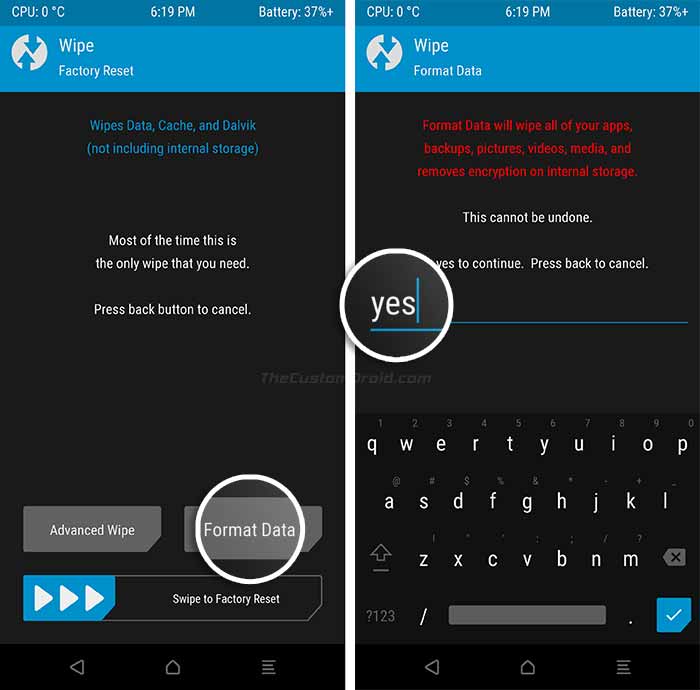
- Now, it is very important that you boot your Galaxy S10 device into stock recovery and perform a factory data reset
- Press the ‘Power’ and ‘Volume Down’ buttons to exit download mode. As soon as the screen turns off, press the ‘Power’, ‘Bixby’, and ‘Volume Up’ buttons together to boot into the stock recovery. Make sure that you keep pressing the ‘Volume Up’ button until the stock recovery screen appears.
- Use the Volume buttons to highlight the ‘Wipe data/factory reset’ option and press the Power button to select it
- Now, select the ‘Reboot system now’ option and immediately press the Power, Bixby, and Volume Up buttons together until the Bootloader Warning screen appears
- As soon as the Bootloader Warning screen appears, release all the buttons to boot your Galaxy S10/S10+/S10e into the rooted system.
Once your device boots, complete the initial setup. Then go to the app drawer and launch Magisk Manager. Once you launch the app it will perform all the necessary procedures to set things up. When done, your Galaxy S10 will reboot automatically.
Great! Your Galaxy S10, S10+, S10e is now rooted with Magisk! Wait, there is still some important information below, so make sure to read it.
4. Boot your Galaxy S10 into Recovery or Rooted System (OS)
You have just been able to root Samsung Galaxy S10, S10+, S10e without TWRP. Now before you go, you must first know how the boot sequence on your device will work after the rooting procedure. So, you will need to follow specific instructions to boot your Galaxy S10 into recovery or rooted system (OS) with Magisk.
Like we mentioned above, both the recovery and Magisk will co-exist in the same partition. So, the developer implemented a solution that will detect the button presses to figure which mode the device should boot in.

The steps below are for when your phone is completely powered off. So, to boot into:
- Unrooted System: Press the Power button to power up normally will boot your Galaxy S10 into the Unrooted System.
- Rooted System with Magisk: Hold the Power, Bixby, and Volume Up buttons together. Release all the buttons once the Bootloader Warning screen appears to boot your Galaxy S10 into Rooted System with Magisk.
- Stock Recovery: Hold the Power, Bixby, and Volume Up buttons together. Release the Power and Bixby buttons and keep holding the Volume Up button when the Bootloader Warning screen appears, to boot your Galaxy S10 into stock recovery.
F.A.Q.
- A new update for Magisk has arrived, how can I update?
- It’s easy. Open Magisk Manager and tap on the ‘Update’ button and let it do the rest for you. According to the developer, you can only upgrade Magisk from within the Magisk Manager app, for now.
- After performing this procedure and rooting my Galaxy S10, I am not able to use apps like Samsung Pay, Secure Folder, etc. What should I do?
- You were already warned about this in this tutorial. Rooting/flashing any custom binaries trips the KNOX counter, which means you cannot use any apps that rely on its integrity. And no, restoring the stock firmware will not restore KNOX back to stock.
- Can I flash Magisk using a custom recovery like TWRP to root my Galaxy S10/S10+/S10e?
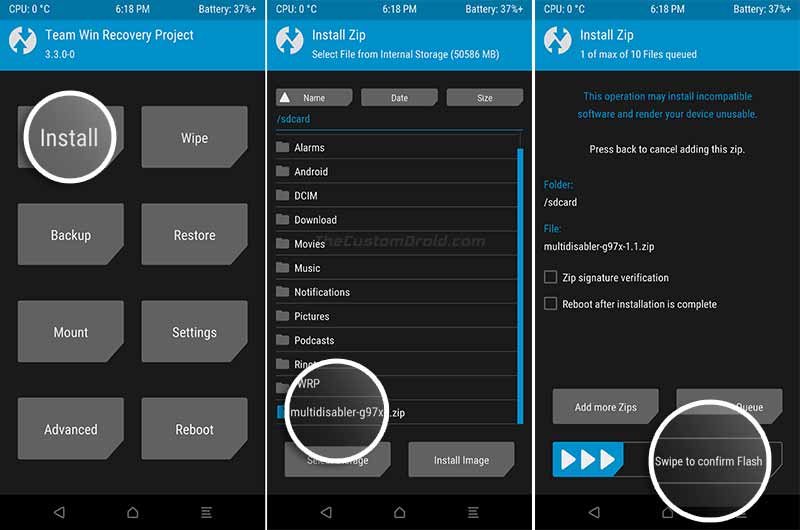
- No, you cannot. The developer has not yet figured out a way to flash Magisk to the recovery partition in custom recoveries like TWRP. Although, if you want there are unofficial TWRP ports available for both Galaxy S10 and Galaxy S10+ that come with pre-patched with Magisk.
- A new software update has arrived for my device, can I restore the stock AP tar file or upgrade by simply flashing the full firmware via Odin?
- Restoring the stock AP file will ultimately lead to soft brick. In which case, you will first need to do a full restore via Odin and then factory reset (wipe) the device. When an update arrives, simply download the updated stock firmware from SamMobile, SamFrew, or using the SamFirm tool. Once done, grab the new AP tar file and repeat the rooting procedure to update.
We cannot end this post without giving a huge thumbs up to Magisk developer topjohnwu! He has surely spent a lot of time and a good amount of effort to finally enable users to root Samsung Galaxy S10, Galaxy S10+, Galaxy S10e devices.
If you have any questions regarding this tutorial, its steps, or anything related to Samsung Galaxy S10 root, then drop a comment below. We shall try to help you with the best of our knowledge.


